When you purchase an merchandise through hyperlinks on this web page, we could earn a fee. Our editorial content material is just not influenced by commissions. Learn the total disclosure.
It’s stated that necessity is the mom of all invention, and people are actually an ingenious lot. Timber have been a few of our biggest sources for instruments and crafts (in addition to meals and drugs) for hundreds of years, and pines are not any exception.
When you’ve questioned tips on how to put all these plentiful needles on a pine tree to make use of, have we bought a terrific concept for you.
Learn on to discover ways to make your personal pine needle baskets with easy family and foraged supplies.
That’ll rely solely on you. Pine needle baskets are remarkably versatile, and you can also make them any dimension, from teensy trinket containers to massive laundry bins. I take advantage of them to retailer knitting notions reminiscent of sew markers or cable needles and to carry varied substances once I’m brewing up natural medicines.
You should use massive, shallow baskets to show dinner napkins or maintain cutlery, whereas tall baskets are perfect for storing picket garments pins. Fill small baskets with cedar shavings, cloves, or rosemary and hold them in closets to fend off moths.
Alternatively, you may stuff them with lavender or lemon balm and use them to scent your mattress linens or tuck them between your pillows as bedtime aromatherapy aides.
My favourite little pine needle basket sits on my bedside desk, the place it retains my nighttime necessities (earplugs, passionflower tincture, lip balm, and many others.) shut at hand and corralled.

Seize a big bag, basket, or bucket, and head out to an space the place there are quite a lot of fallen pine needles. I dwell in an space the place white pine reigns, however now we have some pink pine needles as nicely.
Attempt to keep away from choosing up needles which have mould rising on them. This may seem as grey or brown fuzzy spots. You received’t have the ability to take away the mould, and it’ll unfold to the opposite needles as soon as woven and break down your basket rapidly.
Goal for lengthy, agency brown needles with no mottling or different discoloration.
The variety of needles you collect will rely upon the dimensions of the basket you’re aiming to make. Keep in mind that you’ll be bunching these needles into coils and stitching them collectively, so that you’ll want numerous them. It’s all the time higher to err on the facet of warning and collect greater than you suppose you’ll want.
When you’re so inclined, contemplate leaving a present for the genii loci (native land spirits) or wild animals in thanks for the needles you’re gathering. Right here in Quebec, we go away tobacco, nuts, and indigenous wildflower seeds, however choices will differ relying on the place you might be.
Wash your gathered pine needles in sizzling, soapy water to eliminate any pathogens they is perhaps carrying.
The simplest manner to do that is to place them in a pot with its personal colander, like a pasta pot. Use a little bit of dish cleaning soap within the water, agitate it nicely for a couple of minutes, then carry out the colander basket so the soapy water can drain off.
Pour out the suds and re-fill the pot with clear, sizzling water. Pop the colander again in and make sure that there’s sufficient water to cowl the needles fully. You’ll have to soak these needles for 12-36 hours.
Since they’re dry, they should be re-hydrated to make them pliant sufficient to bend and stitch. In any other case, they’ll break off whilst you’re working with them.
Whenever you’re able to work with them, pour out the water and hold the needles coated with a towel till you’re prepared to make use of them.
*Be aware: When you’d prefer to make a extra colourful pine needle basket, it’s also possible to dye a few of the needles. In the course of the soaking course of, you’ll merely brew up a dye batch with cloth dye and water, and soak as many needles as you want in it.
When you goal to be as pure as doable right here, you can also make plant dyes from native species to tint your needles. Alternatively, it’s also possible to use Kool-Support or RiT dyes for extra vibrant hues.
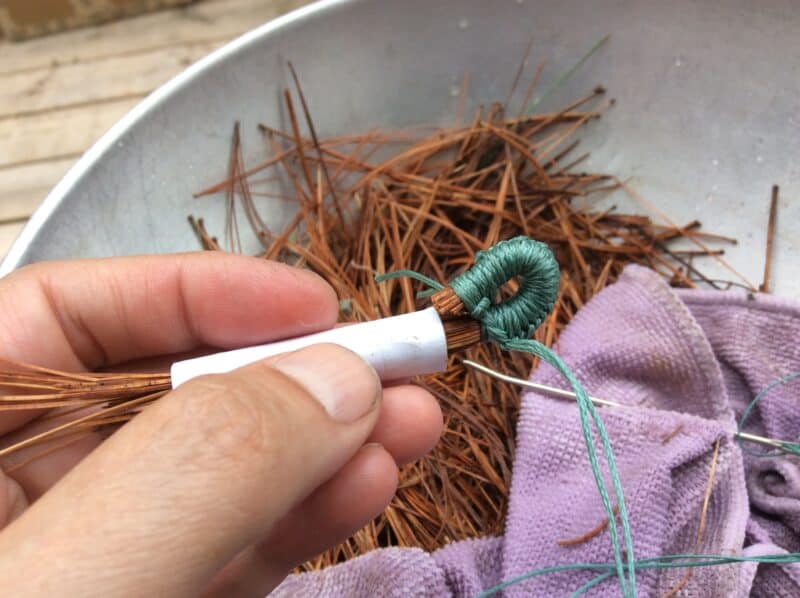
The very first thing you’ll have to do is make a coil loop. This would be the heart level of your pine needle basket, so it must be fairly sturdy.
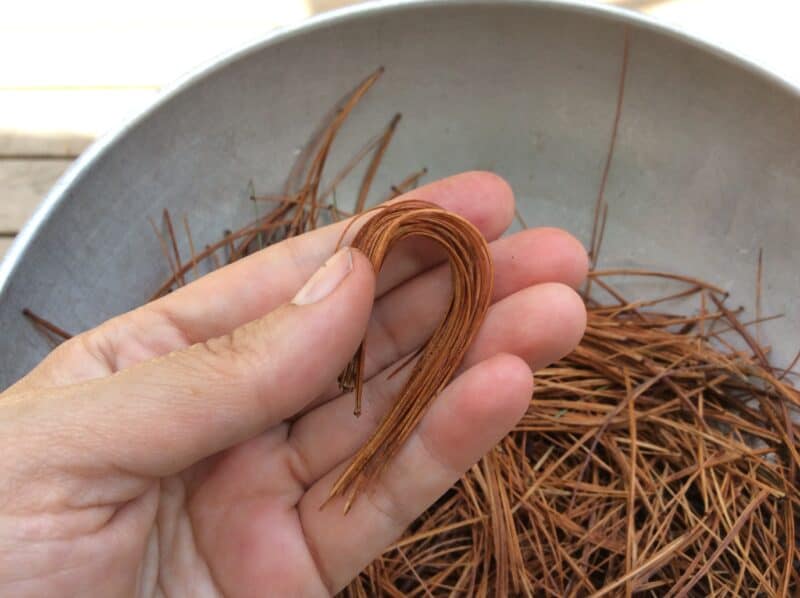
Seize a handful of soaked needles and pull the tip caps off. The needle bundles ought to nonetheless maintain collectively, however you received’t have these exhausting nubs sticking off the ends of them.
Tuck a number of of those into the gauge tube you’ve created, and wrap them with the sinew or waxed thread you’ve chosen.
Wrap this fairly tightly, because it must be sturdy. Once I create mine, I thread my tapestry needle with a double size of string, make a slipknot, after which wrap the thread the identical manner I forged on for a knitting venture.
Finally, so long as it’s sure securely, use any methodology that works for you.
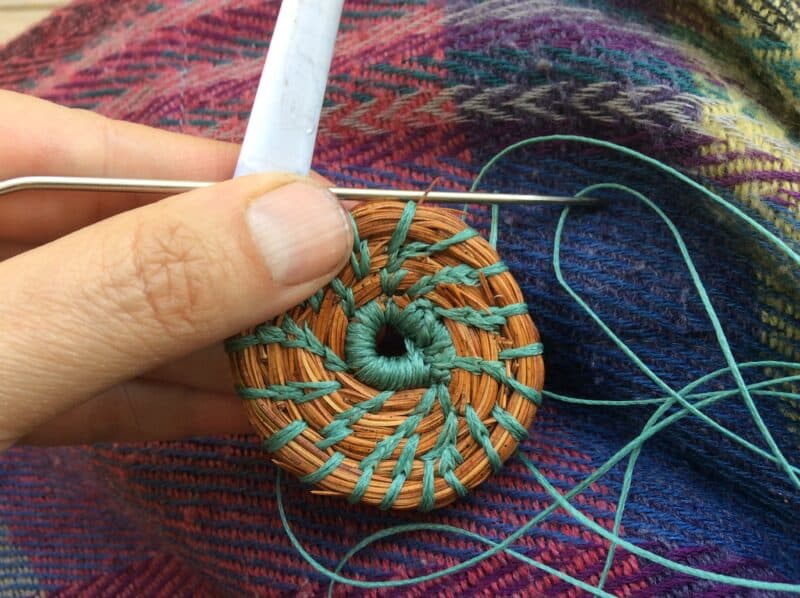
Whenever you’ve wrapped sufficient to create a circle or spiral form with these needles, achieve this, and stitch that circle closed. Now it’s time to begin constructing your basket.
It’s unlikely that you simply’ll have the ability to end your pine needle basket in a single sitting. Retailer your soaked needles in a plastic bread bag, or cowl them with a moist material till you’re prepared to make use of them once more. In the event that they begin to present indicators of mould, soak a contemporary batch and use these as a substitute.
As you make your coils, you’ll have to hold including extra pine needles. You’ll do that by eradicating the tip caps as you probably did earlier after which poking the ends into the middle of your gauge tube.
The objective is to have the ends hidden by the needle ends round it. This may create clean, aesthetically pleasing basket sides fairly than knobby ones.
Thread about 4 ft of thread in your tapestry needle, and tie the ends collectively to create a double layer. This may safe the needles nicely as you go.
For the primary row, you’ll sew across the coil of needles each half inch (or one cm) and safe it into your heart knot. After that, the stitches round every subsequent row shall be pushed by means of the earlier row to safe them.
Goal to make “break up stitches” by means of the stitches you made within the final row: this creates an attractive ladder-like stitching impact and holds the coils very securely.
Because the pine needle basket expands in dimension, you’ll want so as to add extra stitches to carry every thing collectively securely. Do that by stitching an additional sew in between these of the earlier row.
In distinction, if it’s essential to scale back width so you may form the basket smaller—as an illustration, when you’re going to create a lid for it—you’ll return to creating fewer stitches between the coils.
When you sew, you’ll inevitably run out of thread and have so as to add extra. To do that, lower the thread off your needle when there are about 4 inches left.
Thread your needle with a brand new size of thread, and tie the brand new ends to the lower ones, as near the needles as doable. Whenever you sew your subsequent sew, draw the knot in between the needles to cover it. You’ll lower or singe off the bits which can be nonetheless protruding later.

Whenever you get near ending your pine needle basket, you may determine whether or not to make a lid for it or not. Lids are nice for trinkets or storage baskets however aren’t actually needed for bigger ones.
When you do make a lid, you’ll have to create a lip inside your basket for it to take a seat on. To do that, you may merely create a layer that’s drawn barely inwards in comparison with your different coils, adopted by a number of coiled layers which can be pushed outward once more.
Then, to create the lid, you’ll repeat the identical course of you probably did whenever you began the basket’s physique. The one distinction is that you simply’ll cease coiling layers as soon as the lid is the proper dimension to nestle onto the lip you created.
As you draw in direction of ending off this basket, cease including needles to your coil gauge. Proceed stitching round till the needles taper off, so the final needle you must work with lies flat towards the earlier coil layer.
End your basket by tying off your final sew after which drawing the needle again by means of one of many coils to safe it. Pull the thread taut and lower as near the needles as doable.
This may trigger the lower finish to be drawn into the needle coil as soon as pressure is launched, thus hiding it properly. If there’s a unfastened finish out of your starting stitches, poke that in between coils, or burn it to seal it off.
If a tiny little bit of the final needle is protruding, both snip it off or tuck it down into the coil under to cover it.
Repeat this course of for the lid when you’ve made one.
Moreover, you’ll want to determine a technique to transfer that lid round. Some individuals additionally prefer to create a deal with from pine needles, whereas others desire to make use of tiny pine cones, twigs, and even bits of bone. When you’re going to make use of a cone or different small merchandise, you need to use pine pitch glue and some sturdy stitches with thread or sinew to safe it in place.
As soon as accomplished, you may embellish your pine needle basket with beads, charms, or the rest you want.
Use your basket to retailer no matter you’d like, supplied it isn’t moist or sticky! These baskets are troublesome to wash, so it’s finest to solely retailer dry objects inside them. Natural matter that may be moist or gooey can get between the needles and decay them, so make sure you take correct care.
If you wish to protect your pine needle basket long-term, contemplate spraying it in and out with a protecting coating. one is Thompson’s Water Seal, however another waterproofing spray ought to supply some safety as nicely.
Most significantly, have enjoyable! It is a great, inventive course of, and your basket-making expertise will solely enhance with follow.
Yes No
×
Your reply shall be used to enhance our content material. The extra suggestions you give us, the higher our pages might be.
Facebook Pinterest
It’s stated that necessity is the mom of all invention, and people are actually an ingenious lot. Timber have been a few of our biggest sources for instruments and crafts (in addition to meals and drugs) for hundreds of years, and pines are not any exception.
When you’ve questioned tips on how to put all these plentiful needles on a pine tree to make use of, have we bought a terrific concept for you.
Learn on to discover ways to make your personal pine needle baskets with easy family and foraged supplies.
What Can You Use These Baskets For?
That’ll rely solely on you. Pine needle baskets are remarkably versatile, and you can also make them any dimension, from teensy trinket containers to massive laundry bins. I take advantage of them to retailer knitting notions reminiscent of sew markers or cable needles and to carry varied substances once I’m brewing up natural medicines.
You should use massive, shallow baskets to show dinner napkins or maintain cutlery, whereas tall baskets are perfect for storing picket garments pins. Fill small baskets with cedar shavings, cloves, or rosemary and hold them in closets to fend off moths.
Alternatively, you may stuff them with lavender or lemon balm and use them to scent your mattress linens or tuck them between your pillows as bedtime aromatherapy aides.
My favourite little pine needle basket sits on my bedside desk, the place it retains my nighttime necessities (earplugs, passionflower tincture, lip balm, and many others.) shut at hand and corralled.
What You’ll Want
- Dry brown pine needles: gather these off the bottom or take them off fallen useless pine timber. By no means use contemporary inexperienced needles—they’ll shrink as they dry and warp your basket. If When you had a long-needled pine as a Christmas tree, contemplate saving the needles for future initiatives!
- Dish cleaning soap
- Sinew or waxed thread
- Tube: You’ll want a hole, agency tube about two inches lengthy to carry your needles as you’re employed. This does double obligation for holding the needle bundles in place and sustaining thickness consistency in your coils.
- Tapestry or darning needle
- Needle-nose pliers
- Scissors or knife
- Cloth dye (non-obligatory)
1. Collect Needles to your Pine Needle Basket
Seize a big bag, basket, or bucket, and head out to an space the place there are quite a lot of fallen pine needles. I dwell in an space the place white pine reigns, however now we have some pink pine needles as nicely.
Attempt to keep away from choosing up needles which have mould rising on them. This may seem as grey or brown fuzzy spots. You received’t have the ability to take away the mould, and it’ll unfold to the opposite needles as soon as woven and break down your basket rapidly.
Goal for lengthy, agency brown needles with no mottling or different discoloration.
The variety of needles you collect will rely upon the dimensions of the basket you’re aiming to make. Keep in mind that you’ll be bunching these needles into coils and stitching them collectively, so that you’ll want numerous them. It’s all the time higher to err on the facet of warning and collect greater than you suppose you’ll want.
When you’re so inclined, contemplate leaving a present for the genii loci (native land spirits) or wild animals in thanks for the needles you’re gathering. Right here in Quebec, we go away tobacco, nuts, and indigenous wildflower seeds, however choices will differ relying on the place you might be.
2. Wash and Soak!
Wash your gathered pine needles in sizzling, soapy water to eliminate any pathogens they is perhaps carrying.
The simplest manner to do that is to place them in a pot with its personal colander, like a pasta pot. Use a little bit of dish cleaning soap within the water, agitate it nicely for a couple of minutes, then carry out the colander basket so the soapy water can drain off.
Pour out the suds and re-fill the pot with clear, sizzling water. Pop the colander again in and make sure that there’s sufficient water to cowl the needles fully. You’ll have to soak these needles for 12-36 hours.
Since they’re dry, they should be re-hydrated to make them pliant sufficient to bend and stitch. In any other case, they’ll break off whilst you’re working with them.
Whenever you’re able to work with them, pour out the water and hold the needles coated with a towel till you’re prepared to make use of them.
*Be aware: When you’d prefer to make a extra colourful pine needle basket, it’s also possible to dye a few of the needles. In the course of the soaking course of, you’ll merely brew up a dye batch with cloth dye and water, and soak as many needles as you want in it.
When you goal to be as pure as doable right here, you can also make plant dyes from native species to tint your needles. Alternatively, it’s also possible to use Kool-Support or RiT dyes for extra vibrant hues.
3. Make Your Middle Coil
The very first thing you’ll have to do is make a coil loop. This would be the heart level of your pine needle basket, so it must be fairly sturdy.
Seize a handful of soaked needles and pull the tip caps off. The needle bundles ought to nonetheless maintain collectively, however you received’t have these exhausting nubs sticking off the ends of them.
Tuck a number of of those into the gauge tube you’ve created, and wrap them with the sinew or waxed thread you’ve chosen.
Wrap this fairly tightly, because it must be sturdy. Once I create mine, I thread my tapestry needle with a double size of string, make a slipknot, after which wrap the thread the identical manner I forged on for a knitting venture.
Finally, so long as it’s sure securely, use any methodology that works for you.
Whenever you’ve wrapped sufficient to create a circle or spiral form with these needles, achieve this, and stitch that circle closed. Now it’s time to begin constructing your basket.
It’s unlikely that you simply’ll have the ability to end your pine needle basket in a single sitting. Retailer your soaked needles in a plastic bread bag, or cowl them with a moist material till you’re prepared to make use of them once more. In the event that they begin to present indicators of mould, soak a contemporary batch and use these as a substitute.
4. Coil and Sew
As you make your coils, you’ll have to hold including extra pine needles. You’ll do that by eradicating the tip caps as you probably did earlier after which poking the ends into the middle of your gauge tube.
The objective is to have the ends hidden by the needle ends round it. This may create clean, aesthetically pleasing basket sides fairly than knobby ones.
Thread about 4 ft of thread in your tapestry needle, and tie the ends collectively to create a double layer. This may safe the needles nicely as you go.
For the primary row, you’ll sew across the coil of needles each half inch (or one cm) and safe it into your heart knot. After that, the stitches round every subsequent row shall be pushed by means of the earlier row to safe them.
Goal to make “break up stitches” by means of the stitches you made within the final row: this creates an attractive ladder-like stitching impact and holds the coils very securely.
Because the pine needle basket expands in dimension, you’ll want so as to add extra stitches to carry every thing collectively securely. Do that by stitching an additional sew in between these of the earlier row.
In distinction, if it’s essential to scale back width so you may form the basket smaller—as an illustration, when you’re going to create a lid for it—you’ll return to creating fewer stitches between the coils.
When you sew, you’ll inevitably run out of thread and have so as to add extra. To do that, lower the thread off your needle when there are about 4 inches left.
Thread your needle with a brand new size of thread, and tie the brand new ends to the lower ones, as near the needles as doable. Whenever you sew your subsequent sew, draw the knot in between the needles to cover it. You’ll lower or singe off the bits which can be nonetheless protruding later.
5. Ending, Lids, and Decorations
Whenever you get near ending your pine needle basket, you may determine whether or not to make a lid for it or not. Lids are nice for trinkets or storage baskets however aren’t actually needed for bigger ones.
When you do make a lid, you’ll have to create a lip inside your basket for it to take a seat on. To do that, you may merely create a layer that’s drawn barely inwards in comparison with your different coils, adopted by a number of coiled layers which can be pushed outward once more.
Then, to create the lid, you’ll repeat the identical course of you probably did whenever you began the basket’s physique. The one distinction is that you simply’ll cease coiling layers as soon as the lid is the proper dimension to nestle onto the lip you created.
As you draw in direction of ending off this basket, cease including needles to your coil gauge. Proceed stitching round till the needles taper off, so the final needle you must work with lies flat towards the earlier coil layer.
End your basket by tying off your final sew after which drawing the needle again by means of one of many coils to safe it. Pull the thread taut and lower as near the needles as doable.
This may trigger the lower finish to be drawn into the needle coil as soon as pressure is launched, thus hiding it properly. If there’s a unfastened finish out of your starting stitches, poke that in between coils, or burn it to seal it off.
If a tiny little bit of the final needle is protruding, both snip it off or tuck it down into the coil under to cover it.
Repeat this course of for the lid when you’ve made one.
Moreover, you’ll want to determine a technique to transfer that lid round. Some individuals additionally prefer to create a deal with from pine needles, whereas others desire to make use of tiny pine cones, twigs, and even bits of bone. When you’re going to make use of a cone or different small merchandise, you need to use pine pitch glue and some sturdy stitches with thread or sinew to safe it in place.
As soon as accomplished, you may embellish your pine needle basket with beads, charms, or the rest you want.
Use your basket to retailer no matter you’d like, supplied it isn’t moist or sticky! These baskets are troublesome to wash, so it’s finest to solely retailer dry objects inside them. Natural matter that may be moist or gooey can get between the needles and decay them, so make sure you take correct care.
If you wish to protect your pine needle basket long-term, contemplate spraying it in and out with a protecting coating. one is Thompson’s Water Seal, however another waterproofing spray ought to supply some safety as nicely.
Most significantly, have enjoyable! It is a great, inventive course of, and your basket-making expertise will solely enhance with follow.
Was this text useful?
Yes No
×
We respect your useful suggestions!
Your reply shall be used to enhance our content material. The extra suggestions you give us, the higher our pages might be.
Comply with us on social media:
Facebook Pinterest