

Polytunnel, hoop home, row cowl – no matter you wish to name it, they’re useless helpful within the backyard. There are many advantages to be gained by including a polytunnel to your gardening house.
They’re surprisingly simple to make, and this one will final ceaselessly. When you don’t have one but, let’s make one. This would be the 12 months you say, “Now I get why everybody makes use of polytunnels!”
Why You Ought to Have at Least One Polytunnel In Your Backyard


Construct our simple planting grid for $15
It’s such a easy factor, actually, a bunch of hoops caught within the floor with some form of sheeting excessive. However they’re greater than the sum of their elements, affording safety, greater yields and longer seasons. I like to think about them because the gardener’s blanket fort.
And sure, I believe everybody ought to have one, even a small one.
1. A lot Cheaper Than a Greenhouse
Most of us would love a greenhouse full of moss-covered terracotta pots and well-loved gardening implements straight out of a Beatrix Potter story. Sadly, it’s not all the time within the playing cards. However you possibly can nonetheless take pleasure in the advantages of getting your individual little “hothouse” by including a polytunnel to your backyard.
2. You Can Transfer It to The place You Want It
In contrast to a greenhouse, you possibly can transfer a polytunnel. Crop rotation is a pure means to make sure the vitamins in your soil stay balanced and could be replenished primarily based on what you develop there. When you’re planting crops in a special location annually, having a moveable polytunnel makes the method simpler.
3. Take away Pests from the Visitor Record
Japanese Beetles, Colorado Potato Beetles, Imported Cabbageworm, do any of those guys present up and make your rising season a nightmare? Positive, you may combine up all kinds of potions to spray in your greens or purchase some nasty insecticide to wipe them out. However why go to all that fuss when you possibly can develop your veggies undercover and take away sure pests from the visitor checklist solely.
4. Shield Your Vegetation
Even when nibbling bugs aren’t an issue, polytunnels can preserve rabbits, deer and youngsters out of your backyard. If fencing in your backyard isn’t an choice, utilizing polytunnels to guard your veg is the following neatest thing.
5. Prolong Your Rising Season
Look, I’ll fess up if you’ll too. Gardeners are downright aggressive. Oh, your prize tomatoes produced two bushels final 12 months? That’s nice; mine produced two and a half.
We’re all the time on the lookout for that additional edge, even when the one individual we compete with is ourselves. And getting crops within the floor as early as potential is a good way to ensure you’re the primary one with ripe tomatoes. Relying on the place you reside and what kind of poly sheeting you utilize, you may begin your backyard a month or two sooner than regular.
That additionally applies to the opposite finish of the rising season.


There’s something downright magical about strolling out to the backyard in a white, snow-covered panorama and lifting the duvet of your tunnel to search out darkish brown soil and exquisite, crisp lettuce rising.
Fairly nice, proper? Let’s make a polytunnel that may final you ages. We’ll be skipping the normal PVC pipes for this one.


Skip the PVC for a Sturdier Body That’s Higher for the Setting
For the longest time, it appeared everybody used PVC pipes as frames for his or her polytunnels. It’s low cost; it bends simply, and you’ll find it in all places – why not?
PVC isn’t nice for the surroundings to start with, but in addition, it’s not an excellent constructing materials for this sort of venture. PVC is finest reserved for tasks the place it received’t be uncovered to mild. Over the course of the season, the PVC turns into brittle from long-term solar publicity. Finally, it would snap, and your veggie blanket fort will come tumbling down.
When it lastly breaks, it is going to be in a number of sharp plastic shards that at the moment are throughout your backyard. Yay!


For this venture, we needed one thing that was far more sturdy. We selected EMT or electrical metallic tubing, often known as electrical conduit. Usually, it’s used to accommodate electrical wires in buildings.
Nevertheless it’s additionally low cost, bends simply, and you’ll find it in all places. It’s solely about $2 extra per 10’ piece than PVC. To not point out, when you ever resolve you don’t need your polytunnel anymore, you possibly can take your EMT to your native scrapyard and get money for it or recycle it. All in all, it’s a a lot better various to PVC.
How one can Make a Polytunnel
EMT is available in 10’ lengths making it the right measurement for polytunnels, whether or not your rows or raised beds are 4’ or 3’ vast. After the EMT is bent and inserted into the bottom, you’re left with the right top and loads of house for tall crops.
Supplies


- ½” diameter EMT in 10’ lengths – you’ll need two items, one for every finish of your row and one-piece each 4’ of the size of your row. For instance, our 16’ lengthy rows wanted 5 items whole.
- Sheeting – what you select will rely on the place you reside, how lengthy you need the sheeting to final and what you wish to accomplish.
- Poly sheeting is healthier at defending from chilly temperatures because it’s thicker and impermeable, so it’s nice for extending the season. Nevertheless it doesn’t breathe, so it’s possible you’ll must vent your tunnel often when you use it for the whole season.
- Row cover fabric is lighter, breathable and simpler to control. It’s nice for holding out pests. Whereas it does provide some chilly safety, it’s not nearly as good a barrier as poly sheeting. As a result of it’s a cloth, it will probably additionally tear.
- It’s possible you’ll want to use each at totally different occasions throughout the season.
- Sturdy clips – I selected these metal spring clips as a result of they’re a lot simpler to get on and off than different choices. You’ll want 5 clips for every hoop.
- Two bricks or giant rocks to carry down the ends of your sheeting.
Bending the Conduit
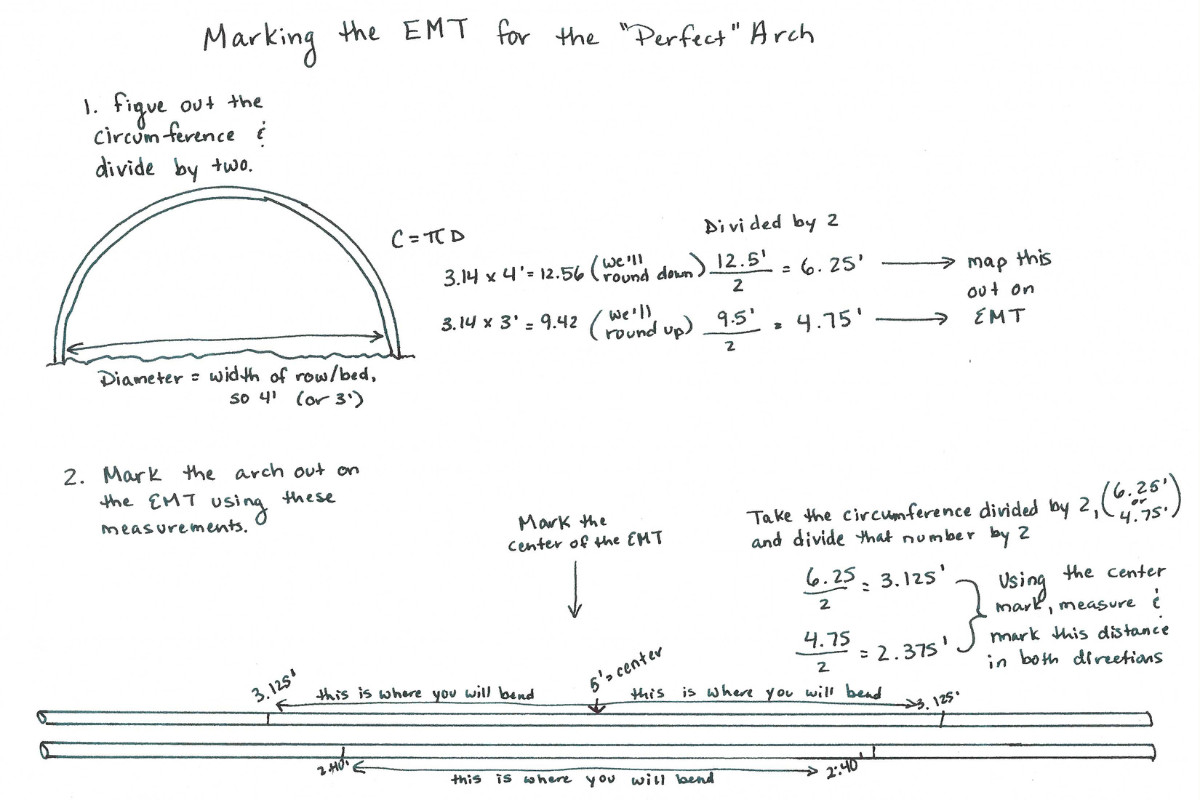
To type a (largely) good arch, you’ll need to do some math. Okay, okay, I did it for you.

There are a number of other ways to bend conduit, all of which require a device. It’s possible you’ll have already got certainly one of these instruments, or it’s possible you’ll wish to construct a jig. I’ve made a observe about choices for sourcing these instruments as effectively.
Conduit Bender


A conduit bender is essentially the most cheap choice for bending your hoop frames. You could find them in your native ironmongery shop or large field house enchancment retailer, or you possibly can even order one on Amazon. In addition they require essentially the most elbow grease; though it’s not onerous to make use of them, it’s solely compared to the opposite two choices.


(After getting the place you’ll be bending marked out in your EMT, place a mark each 4.2” (3.2” for 3’ vast beds). Use these marks for bending 10 levels at a time with the conduit bender.)
Tubing Roller


Tubing rollers could make fast work of bending the conduit into the correct arch if you have already got one. Even with out the appropriate measurement curler, it may be performed when you’re cautious.
Hoop Bender Jig
You should purchase a jig particularly for this function; they’re fairly simple to search out on the web. You can even make a jig with scraps you have already got; it doesn’t should be fancy to get the job performed. Here’s a YouTube tutorial displaying you ways.
Word: Sourcing These Instruments
When you solely must bend a number of items of conduit, it doesn’t make sense to buy a device. Until, after all, you see your self with the ability to use it once more for different tasks sooner or later.
- Ask household, buddies or neighbors if they’ve a conduit bender or tubing curler; even higher if they provide that can assist you use it.
- Name your native ironmongery shop or tools rental place and ask about renting the device for the job. Most of those locations hire out oddball hand instruments in addition to giant tools.
- Examine Fb Market, Craigslist or Freecycle and see if you’ll find the device you want second-hand. Alternatively, I’ve usually bought particular instruments new for tasks after which resold them in these identical shops. Instruments, typically, appear to get snatched up shortly, particularly in the event that they’ve solely been used a couple of times.
When you’ve bent your hoops, they are often inserted into the bottom. It is best to have the ability to do that by hand, however a rubber mallet could be useful in case your floor is tough.


After that, you cowl the frames together with your most well-liked sheeting materials. Be sure you don’t stretch it out too tightly. You need a bit give in between hoops so it will probably flex within the breeze with out tearing.
Place 5 clips on every hoop to carry the sheeting in place snuggly – one on the high of the ring, one at every base and one on both sides about halfway between the highest and backside clips.


Fold any extra sheeting on every finish and safe it in place with a brick or a rock.


And that’s that. That is a kind of tasks that may take a few hours out of your Saturday, however you’ll have an excellent setup that you should utilize 12 months after 12 months.

Get the well-known Rural Sprout publication delivered to your inbox.
Together with Sunday ramblings from our editor, Tracey, in addition to “What’s Up Wednesday” our roundup of what’s in season and new article updates and alerts.